Automatic Lawn Sprinkler System Installation: Top 6 Easy Steps
Introduction
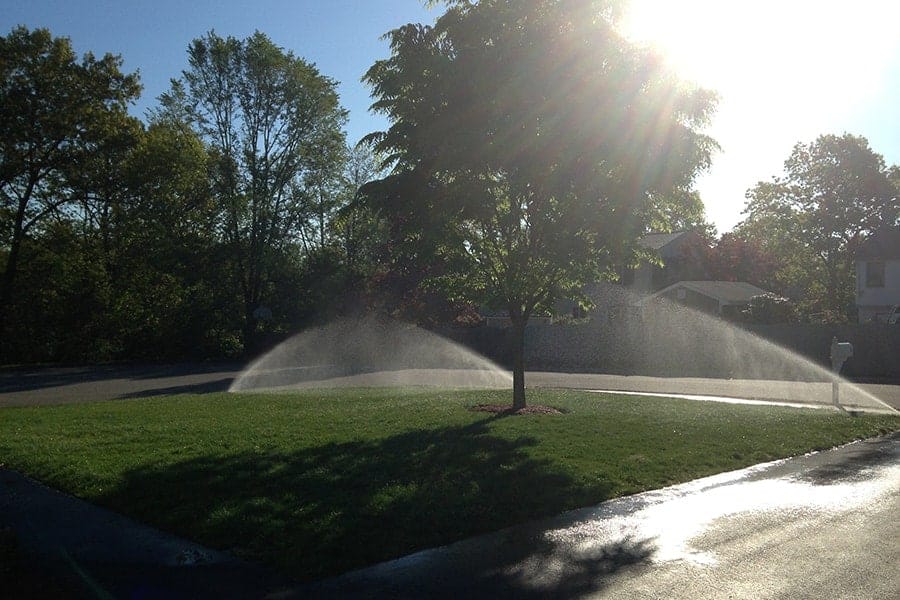
Automatic Lawn Sprinkler System Installation can transform the way you water your lawn, making it more efficient and convenient. Whether you’re a homeowner looking to save time and money or a commercial property manager aiming to maintain lush, healthy landscapes, an automatic sprinkler system is a great investment.
Key Points to Know:
– Effortless Lawn Maintenance: Automate your watering schedule to keep your grass green with minimal effort.
– Water Efficiency: Reduce water waste and lower your water bills by delivering the right amount of water where it’s needed.
– Increased Property Value: A well-maintained lawn can enhance curb appeal and increase property resale value.
Automatic sprinkler systems offer precise watering to meet the needs of different grasses, flowers, and shrubs in your yard. This ensures your landscape looks its best all year. While the upfront costs can be high, the long-term benefits and savings make it a worthwhile investment.
By investing in a professionally installed system, you ensure proper setup and maintenance, adding to the longevity and efficacy of your irrigation.
Planning Your Automatic Lawn Sprinkler System Installation
Before you start digging, it’s crucial to plan your Automatic Lawn Sprinkler System Installation. This ensures you get the best results and avoid costly mistakes. Here’s how to get started:
Site Assessment
First, assess your site to understand its unique characteristics. Take note of:
- Soil type: Clay, sandy, or loam soil affects how water is absorbed. Clay soil absorbs water slowly, sandy soil drains quickly, and loam soil is ideal for most lawns.
- Landscape features: Identify areas with trees, shrubs, flower beds, sidewalks, and slopes. These will determine the placement and type of sprinkler heads.
- Sun and shade areas: Different parts of your lawn may need more or less water depending on sunlight exposure.
Water Source
Next, determine your water source. You’ll need to know:
- Water pressure: Use a pressure gauge to measure your home’s water pressure in PSI. Attach the gauge to an outdoor faucet and ensure all other faucets are off for an accurate reading.
- Flow rate: Measure the flow rate by filling a container with water from your outside spigot and timing how long it takes. Use the formula: GPM = (gallons / seconds) x 60.
- Water meter size: For municipal systems, find the size printed on the meter or check your utility bill. For wells, refer to the pump size in the owner’s manual.
Local Regulations
Check local regulations to avoid legal issues:
- Building permits: Some areas require permits for installing sprinkler systems.
- Watering ordinances: Understand any restrictions on watering times or days.
- Professional installation requirements: Some states or localities require a licensed professional for installation.
Utility Lines
Before you dig, ensure safety by checking for underground utilities:
- Call 811: This free service will mark the location of underground utilities, so you don’t accidentally hit gas, water, or electrical lines.
- Mark the utilities on your map: Incorporate these markings into your design layout to avoid conflicts.
By thoroughly planning your Automatic Lawn Sprinkler System Installation, you set the stage for a smooth and efficient process. In the next section, we’ll discuss choosing the right components for your system.
Choosing the Right Components for Your Sprinkler System
Selecting the right components for your Automatic Lawn Sprinkler System Installation is crucial for efficiency and longevity. Let’s break down the essential parts you’ll need: Sprinkler types, Controllers, Sensors, Valves, and Pipes.
Sprinkler Types
Sprinkler heads come in various styles, each suited for different watering needs:
- Pop-up Sprinklers: Ideal for lawns, these heads remain below ground level when not in use, preventing damage from mowers and foot traffic. They pop up when activated and can be adjusted for different spray patterns.
- Rotary Sprinklers: Perfect for large areas, these sprinklers rotate to distribute water evenly. Rain Bird’s rotary sprinklers with Rain Curtain™ nozzle technology are highly efficient, reducing overspray and ensuring even coverage.
- Shrub Sprinklers: Taller than pop-up heads, these are designed for flower beds and shrubs. Select the proper height based on the mature size of your plants to ensure effective watering.
Controllers
Controllers, or timers, are the brains of your sprinkler system. They automate the watering schedule, ensuring your lawn gets the right amount of water at the right times.
- Basic Controllers: These offer simple scheduling options and are easy to set up.
- Smart Controllers: Advanced models can adjust watering schedules based on weather conditions, soil moisture, and other factors. They save water and provide optimal irrigation.
Sensors
Sensors enhance your system’s efficiency by adjusting watering based on real-time conditions:
- Rain Sensors: These prevent the system from running during rain, avoiding overwatering.
- Soil Moisture Sensors: These measure soil moisture levels and adjust watering accordingly, ensuring your plants get the right amount of water.
Valves
Valves control the flow of water to each zone. Each zone has its own valve, allowing for precise control over where and when water is delivered:
- Control Valves: These are essential for managing different zones. They open and close to allow water flow based on the controller’s schedule.
- Shut-off Valves: Installed near the water source, these allow you to shut off the entire system for maintenance or repairs.
Pipes
Choosing the right pipes is critical for maintaining water pressure and preventing leaks:
- PVC Pipes: Commonly used for sprinkler systems, PVC is durable and easy to work with. It’s ideal for underground installation.
- Copper Pipes: Though more expensive, copper is highly durable and resistant to corrosion. It’s often used for connections near the water source.
- Flexible Tubing: Useful for navigating around obstacles, flexible tubing can be used in conjunction with PVC or copper pipes.
When selecting components, consider the specific needs of your landscape and water supply. Using high-quality materials and compatible parts ensures your system operates efficiently and lasts for years.
In the next section, we’ll guide you through the step-by-step process of installing your automatic lawn sprinkler system.
Step-by-Step Guide to Installing an Automatic Lawn Sprinkler System
Step 1: Design Layout
Start by sketching your yard. Mark property boundaries, existing plants, and structures. Identify zones based on plant types and water needs. Proper zoning ensures efficient water use. For instance, lawns need more water than flower beds. Aim for full coverage without overwatering any area.
Step 2: Digging Trenches
Mark trench locations with stakes or flags. Use a gas-powered trenching machine to dig trenches 4 to 12 inches deep, depending on local guidelines. Trenching tools can be rented, and many rental dealers offer delivery for a small fee. Ensure trenches are straight and at the correct depth to avoid future issues.
Step 3: Installing Pipes and Valves
Lay PVC pipes in the trenches. Use PVC cement and primer to join sections. For copper connections, solder the pipes. Install a backflow preventer to protect your water supply from contamination. Connect the main water line to a manifold with zone valves. Each valve controls a specific zone, ensuring precise watering.
Step 4: Setting Up Sprinkler Heads
Attach pop-up sprinklers to flexible piping at the end of each branch. Push the barbed fitting into the pipe—no glue needed. For larger areas, use rotary sprinklers. Adjust nozzles for proper spray patterns and coverage. Ensure heads are level with the ground for even water distribution.
Step 5: Wiring and Controller Setup
Run 24-volt underground wire from the valve box to the timer location. Connect wires from each valve to the timer. Install the timer according to the manufacturer’s instructions. Program the timer for automatic watering. Flexible scheduling allows customization based on your lawn’s needs.
Step 6: Testing and Adjustments
Turn on the water to flush the system and remove debris. Check each zone for proper operation. Adjust spray patterns and nozzle settings to ensure even coverage. Make necessary adjustments to the timer settings for optimal watering schedules.
In the next section, we’ll discuss essential maintenance tips for keeping your sprinkler system in top condition year-round.
Maintenance Tips for Your Sprinkler System
To keep your automatic lawn sprinkler system running smoothly, regular maintenance is key. Here are some essential tips for seasonal care, winterizing, and addressing common issues.
Seasonal Care
Spring Start-Up:
- Check Water Pressure: Before the first use of the season, ensure your system’s water pressure is between 40 and 65 PSI. Too high or too low pressure can cause inefficiency.
- Inspect Sprinkler Heads: Look for clogged or broken heads. Replace any damaged ones and clean clogged nozzles to ensure even water distribution.
- Adjust Sprinkler Heads: As plants grow and landscaping changes, you may need to adjust the spray patterns and angles of your sprinklers.
Mid-Season Maintenance:
- Look for Leaks: Regularly check for signs of leaks, such as water pooling or unusually green patches of grass. Leaks can waste water and increase your bill.
- Clear Debris: Remove any debris around sprinkler heads to prevent blockages.
- Monitor Coverage: Ensure that all areas of your lawn are receiving adequate water. Adjust the system as needed to avoid dry spots.
Fall Shut-Down:
- Reduce Watering: Gradually reduce the watering frequency as temperatures drop.
- Inspect System: Perform a thorough inspection and address any issues before winterizing.
Winterizing
Winterizing your sprinkler system is crucial to prevent damage from freezing temperatures.
- Turn Off the Water: Shut off the main valve beside your water meter to stop water flow into the system.
- Stop the Timer: Turn off the automatic timer or set it to “rain mode” to avoid accidental activation during winter.
- Drain the System: Depending on your system, use one of the following methods to drain water:
- Auto-Drain Valves: Turn off the water supply and open the auto-drain valves.
- Manual Drains: Open each valve manually to let the water run out.
- Blow-Out Method: Use an air compressor with pressure between 50 and 100 PSI to blow out the remaining water from each zone.
Common Issues
Clogged Sprinkler Heads:
- Symptom: Uneven water distribution or no water flow.
- Solution: Remove the nozzle and clean it with water. Use a small wire to clear any debris from the head.
Leaks:
- Symptom: Water pooling, damp areas, or inconsistent pressure.
- Solution: Identify the source of the leak. Replace faulty sprinkler heads or repair damaged pipes.
Pressure Problems:
- Symptom: Sprinkler heads not popping up or misting instead of spraying.
- Solution: Check for clogs or leaks. Install a pressure-reducing valve if the pressure is too high. Ensure the system is not overextended; create more zones if necessary.
By following these maintenance tips, you can keep your automatic lawn sprinkler system in excellent condition, ensuring a lush and healthy lawn year-round.
In the next section, we’ll answer some frequently asked questions about automatic lawn sprinkler system installation.
Frequently Asked Questions about Automatic Lawn Sprinkler System Installation
How much does it cost to install a smart sprinkler system?
The cost to install a smart sprinkler system can vary widely based on several factors. On average, you might expect to pay between $500 and $3,500. This range includes the price of smart controllers, sensors, and professional installation. Factors affecting cost include:
- Yard Size: Larger yards require more zones and equipment, increasing costs.
- System Complexity: Advanced features like weather-based adjustments and soil moisture sensors add to the price.
- Labor Costs: Professional installation can vary depending on local rates and the complexity of the job.
For a more accurate estimate, it’s best to get a detailed quote from a professional installer like P.J. Pappas, who can assess your specific needs.
Can I install a sprinkler system myself?
Yes, you can install a sprinkler system yourself, but it’s a complex and labor-intensive project. Here’s what you need to consider:
- Research: Understand your water pressure, meter size, and flow rate.
- Planning: Sketch out your yard and plan zones for optimal coverage.
- Tools and Materials: You’ll need tools like trenchers, PVC pipes, valves, and sprinkler heads.
- Skills: Basic plumbing and electrical skills are essential.
While DIY installation can save you money, hiring a professional ensures the job is done right. In some regions, local regulations may require a licensed contractor for certain aspects of the installation.
How to winterize your sprinkler system?
Winterizing your sprinkler system is crucial to prevent damage from freezing temperatures. Here’s a simple guide:
- Turn Off the Water: Shut off the main valve next to your water meter and any backflow prevention valves.
- Stop the Timer: Switch your automatic timer to “rain mode” to preserve settings without running the system.
- Drain the Water:
- Manual Draining: Open shut-off valves at the ends of the piping to let water run out.
- Automatic Draining: Some systems have automatic drain valves that open when water pressure drops.
- Blow-Out Method: Use an air compressor to blow out remaining water from the system.
- Insulate Exposed Parts: Wrap any above-ground pipes and backflow preventers with insulation tape.
Winterizing prevents frozen pipes and sprinkler heads, saving you from costly repairs. Always consult your system’s manual for specific instructions.
In the next section, we’ll delve into more details about the benefits and potential return on investment of installing an automatic lawn sprinkler system.
Conclusion
Installing an automatic lawn sprinkler system can transform your yard into a lush, green oasis while saving you time and water. By following the steps we’ve outlined, you can achieve professional results even if you’re a DIY enthusiast.
At P.J. Pappas Company, we take pride in our specialized focus on irrigation and landscape lighting. With over 37 years of experience, we have honed our skills to deliver precise, reliable, and efficient installations. Our expertise ensures that every component of your sprinkler system is installed correctly for optimal performance.
We understand that every property is unique. That’s why we offer customized solutions tailored to meet your specific needs. Whether you have a small residential lawn or a large commercial property, we design and install systems that cater to your requirements.
When you choose P.J. Pappas, you’re not just getting an installation; you’re gaining a partner dedicated to the ongoing maintenance and support of your system. Our team is always available to ensure your sprinkler system runs smoothly year after year, giving you peace of mind.
Experience the difference that specialization makes. Contact P.J. Pappas Company today for a free estimate and take the first step towards a healthier, more beautiful lawn.
For more information on our services, visit our website.
